5 Key things how to make a scalable and easy-to-maintain webflow website
If you are new to Webflow, you’ve probably experienced times when every update is a nightmare and every change brings more issues.
.jpeg)


If you are new to Webflow, you’ve probably experienced moments where every update is a nightmare and every change brings more issues.
To avert those situations, we created a Webflow guide that we employ in training our new developers. Here, we are going to cover 5 tips on how to make a scalable and easy-to-maintain Webflow website. This will ensure that your website is clean and adaptable.
Tip #1 - How not to name classes
Name classes like Div Block 14 Paragraph 34 Link 9 should not be utilized since they cannot be reused and modifications made on the website will not be synchronized.
-min%2520(1).jpeg)
That’s why class names should make sense so they can be reused. Here are a few instances: Testimonial Card, Feature Image, Client Logo, and Footer Link...
-min%2520(1).jpeg)
Let's cover more about the classes below:
Tip #2 - Fonts
As every project typically commences with uploading fonts in Webflow, we have a few protocols we adhere to when doing so:
Don’t use Google Fonts library
Whenever you use the Google Fonts library, it will pull a script that will:
- Slow down your site and affect its performance.
- Will load all font weights from Google.
- Loading a Google Fonts script requires a custom Cookie and Privacy policy.
Don’t use Adobe Typekit
For the same reason as for Google fonts:
- This can slow down your site and affect its performance.
- This will load all font weights from Adobe.
- Loading the Adobe Typekit script requires a custom Cookie and Privacy policy.
Always upload WOFF/OTF custom font files
WOFF is the smallest font file, and it will impact your site speed the least, but if you cannot “hunt down” an original WOFF file for the font, feel free to use any other files provided by your client or your font library.
It's important that you only add the font weights you will be using in the project and refrain from adding unnecessary files.
Add Font to Global Body Tag
You can alter the default font for any new items you add to a website by adding the font to a global body tag. This will hasten the development process and enable quick changes to the website's whole font with only a few clicks.
.gif)
Tip #3 - Global Styles
It’s crucial to set up global styling for these next elements:
- Body
- Headings H1 - H6
- Paragraphs
- Quotes
- Labels
- List Item
- Unordered List Item
- Ordered List Item
- Links
- Rich text elements
.gif)
Not only does this save considerable time in the web development phase, but it is also a lifesaver when, for example, the client asks to increase or reduce the H2 for 2px. This will save you from manually checking every h2 across the website, and in just a few clicks, you can change the global styling of any element.
Tip #4 - Reusable Classes
When creating reusable classes, anyone who works on your website in the future will appreciate it.
Text Colors:
The global text color may not always work for you in some instances, so we utilize a setting that is comparable to background colors:
Example:
- Text White
- Text Black
- Text Blue
Margin:
For Margins, we create a wide spectrum of classes and assign them a style based on the design provided.
Example:
- Margin XS - Desktop 12px, Tablet 8
- Margin S - Desktop 16px, Tablet 12px
- Margin M - Desktop 24px, Tablet 16px
- Margin L - Desktop 32px, Tablet 24px
- Margin XL - Desktop 56px, Tablet 32px
- Margin XXL - Desktop 80px, Tablet 56px
- Margin 3XL - Desktop 100px, Tablet 80px, Mobile 56px
Max Width:
We use utility classes: ( Example Values)
- Max Width S - 250px
- Max Width M - 370px
- Max Width L - 480px
- Max Width XL - 555px
- Max Width XXL - 780px
- Max Width 3XL - 900px
All Max Width classes are scalable to a Tablet, Mobile Landscape, and Mobile accordingly.
Overflow None:
- Overflow None - Removes overflow from the element.
Relative:
In some cases, we need to make a certain element relative so we can have some deco image in it. And for that, we have a global class.
Relative - The only style change is position: relative;
Z Index :
Adds a Z index to the element usually used, namely:
- Z Index 1 - Adds style z-index: 1;
- Z Index 2 - Adds style z-index: 2;
- Z Index 99 - Adds style z-index: 99;
Text Alignment:
Text alignment is applied only to the text element itself. We’ve tried applying it to parent classes, but it doesn’t play out so well in the end as it may need us to override text positioning for the Component Classes.
- Text Left - Align text to the left side.
- Text Right - Align text to the right side.
- Text Center - Align text to the center.
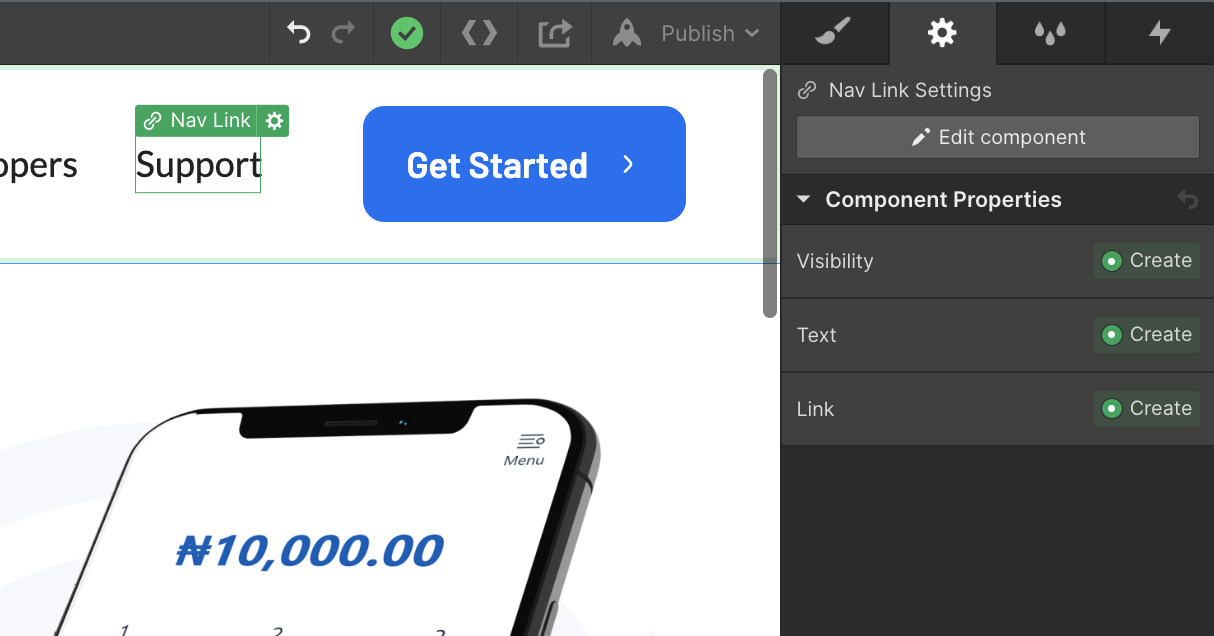
Tip #5 - Symbols/Components
Creating Symbols for Navigation and Footer is a necessity for almost every project. But with the new Components feature it has far more potential.
With Components, instances don’t have to be 100% identical, this means that you can override some properties for every instance individually.
- Visibility: You can hide or show specific elements within your component
- Text: Override any text in the component
- Link: Change href for any link inside your component
- Image: Replace images and alt text
Bonus Tip - Font Rendering Code
Improve how fonts are rendered on the live site. These few lines of code will make your fonts look better and this is an inevitable part of our projects.
<style>
/* Fixing Font Weight for Browsers */
body {
-webkit-font-smoothing: antialiased;
-moz-osx-font-smoothing: grayscale;
}
</style>
Put this code at the end of the <head> tag.
In summary
Whether you are starting with Webflow website development or have been using it for a while, These 5 key tips on how to make a scalable and easy-to-maintain Webflow website will help make the process smoother. Keep in mind how crucial it is to name classes correctly for simpler synchronization. You will save time by using fonts, global styles, reusable classes, and symbols, all of which are essential to maintaining a "clean" Webflow website.
With all this in mind, we hope that the information above has helped you understand.

Share this story on:
Popular Blogs
.webp)

%20(1).png)